Smart Beauty Decoded: How I Get $100 Nails for $20 (And You Can Too)
NAILS
11/12/202520 min read
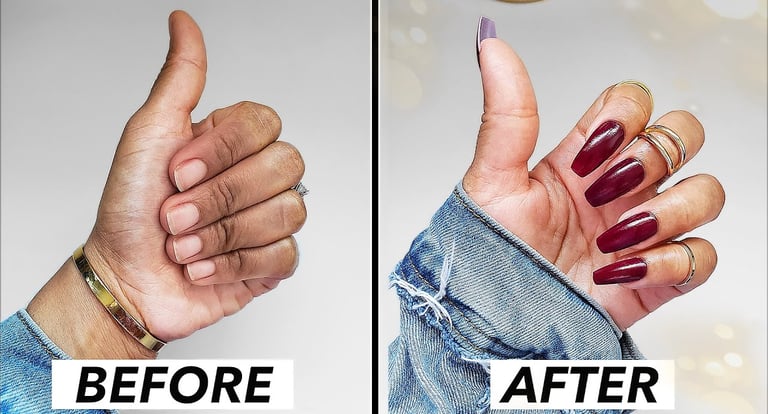
Let's be real – as someone who juggles work, life, and everything in between, I need beauty solutions that actually work WITH my schedule, not against it. Traditional salon manicures? Beautiful, yes. But practical for a busy lifestyle? Not so much.
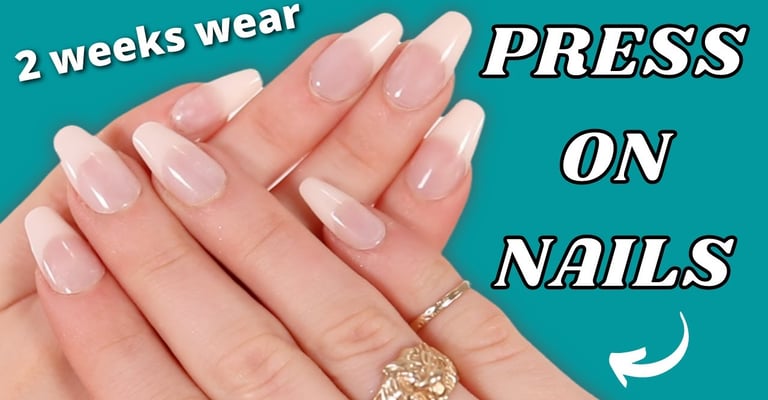
That's why I'm obsessed with this smarter approach to nails: press-on nails that look expensive, last longer than gel, and give you back hours of your week. Welcome to my comprehensive curated edit of GLAMERMAID press-on nails – because you deserve to look polished without the salon drama.
Why This Edit Made My List: The Complete Analysis
I'm obsessed with finding beauty products that are actually worth your time and money – no fluff, just results. Press-on nails were a total game-changer for me, and after six months of rigorous testing, here's my data-backed breakdown of why they earned a permanent spot in my curated collection.
The Smart Investment: Let's Talk Numbers
Let me break down the math (because we love data here):
Annual Cost Comparison:
Traditional gel manicure: $50-70 every 2 weeks = $1,300-1,820/year
Acrylic nails: $60-80 every 3 weeks + fills = $1,040-1,400/year
Regular polish (salon): $25-40 weekly = $1,300-2,080/year
<u>GLAMERMAID press-ons</u>: ~$15-25 per set, reusable 2-3 times = $200-400/year
Your annual savings: Between $900-1,620
That's not just pocket change – that's a flight to Europe, a designer bag, a comprehensive skincare overhaul, or serious investment in your savings account. Smart spending is chic spending, and these numbers don't lie.
Time Optimization at Its Finest
Here's where the real value becomes clear:
Time Investment Breakdown:
Salon gel manicure: 1.5-2 hours (plus 30-45 min travel time) = ~2.5 hours total
Acrylic application: 2-3 hours initial, 1-1.5 hours for fills
At-home regular polish: 1 hour (including prep, drying, cleanup)
Press-ons: 15 minutes, anywhere, anytime
With biweekly salon visits, you're spending approximately 5 hours per month just on nails. That's 60 hours annually – more than a full work week! With press-ons, I've reclaimed 50+ hours per year. That's time for a side hustle, extra workouts, reading 10+ books, or actually enjoying life.
Health & Sustainability Factor
This is the part that surprised me most. After years of gel manicures, I noticed my natural nails were:
Thinner and more brittle
Yellowed from UV exposure
Prone to peeling and breaking
Dependent on constant professional care
After 6 months of exclusively using press-ons:
My natural nails are stronger
No UV damage (gel requires UV lamps that age hands)
No harsh acetone soaks damaging the nail bed
Complete control over when I wear "enhanced" nails
Plus, with reusable press-ons, you're generating less waste than weekly polish changes or monthly acrylic applications. It's the more sustainable choice.
Versatility Meets Practicality
Here's what sets GLAMERMAID apart in my curated selection: endless design options without the commitment. Chrome for Monday's presentation, nude for Wednesday's client meeting, bold glitter for Friday night – all without damaging your natural nails or breaking the bank.
Want to try a trendy design you're unsure about? Test it for a weekend. Hate it? Remove it in 10 minutes. Love it? Keep wearing it for two weeks. It's beauty optimization at its best.
Press-On Nails vs. Other Manicure Methods: The Data-Driven Comparison
Detailed Method Analysis:
Gel Manicures:
Cost: $50-70 per session
Duration: 2-3 weeks
Application time: 1.5-2 hours
Removal: Requires acetone soak, potential damage
Nail health impact: UV exposure, nail thinning
Design flexibility: Limited to tech's skill
Best for: Those who want long-lasting color and can commit to regular appointments
Acrylic Nails:
Cost: $60-80 initial, $40-50 fills
Duration: 3-4 weeks between fills
Application time: 2-3 hours initial
Removal: Professional removal required, high damage risk
Nail health impact: Significant thinning, requires "breaks"
Design flexibility: High, but commitment is long-term
Best for: Those wanting length and don't mind maintenance
Dip Powder:
Cost: $45-65 per session
Duration: 3-4 weeks
Application time: 1-1.5 hours
Removal: Acetone soak, moderate damage
Nail health impact: Healthier than acrylics, but still uses chemicals
Design flexibility: Moderate
Best for: Those wanting durability without UV
Regular Polish (Professional):
Cost: $25-40 per session
Duration: 3-7 days before chipping
Application time: 45-60 minutes
Removal: Easy, minimal damage
Nail health impact: Minimal if using quality products
Design flexibility: Depends on tech skill
Best for: Those okay with frequent changes
Press-On Nails (GLAMERMAID):
Cost: $15-25 per set (reusable 2-3 times)
Duration: 1-2 weeks per application
Application time: 15 minutes
Removal: Easy, no damage
Nail health impact: None – actually protective
Design flexibility: Unlimited, change anytime
Best for: Busy people who want flexibility and quality
The Winner: For cost-effectiveness, time efficiency, nail health, and flexibility, press-ons dominate every category except extreme length (where acrylics win).
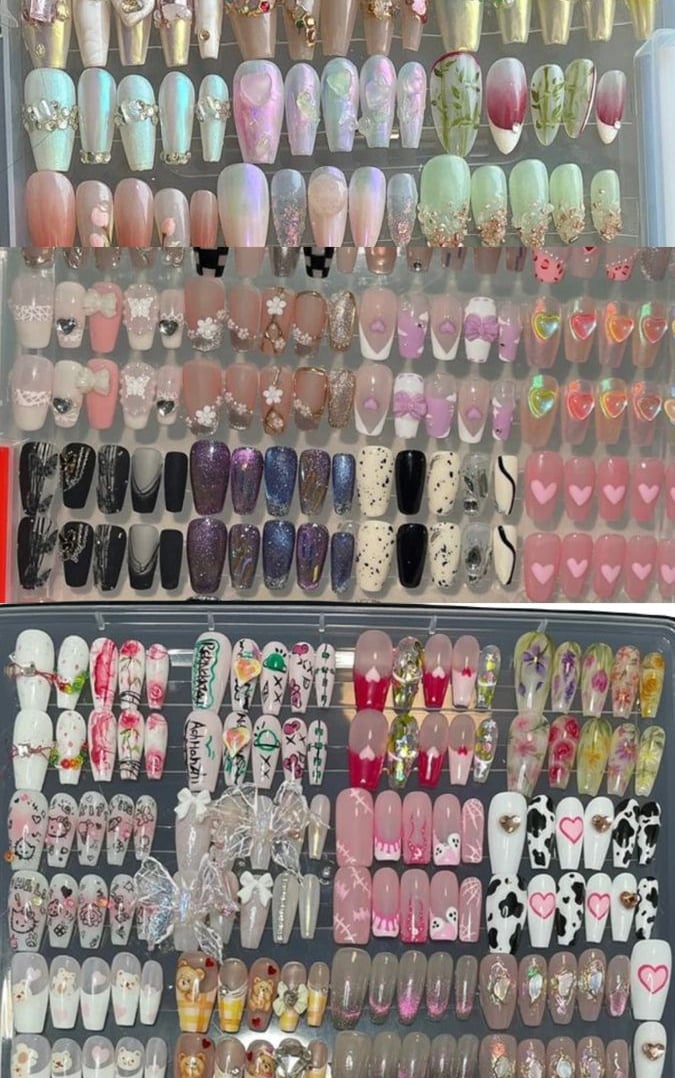
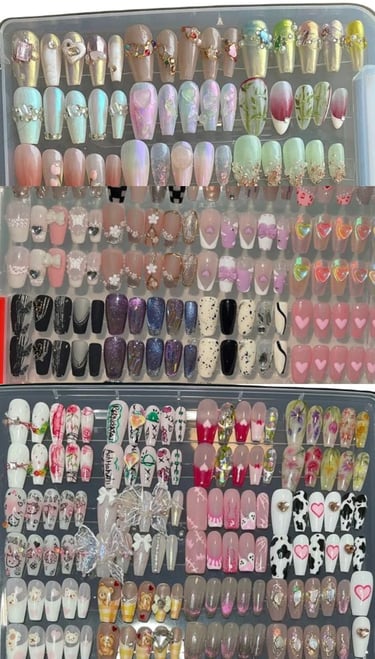
My Curated GLAMERMAID Review: The Details That Matter
I've tested multiple press-on brands over the past year (Kiss, Static Nails, Olive & June, imPRESS, and more), and GLAMERMAID consistently delivers on quality, fit, longevity, and design aesthetic. Here's my analytical breakdown:
Quality That Speaks for Itself
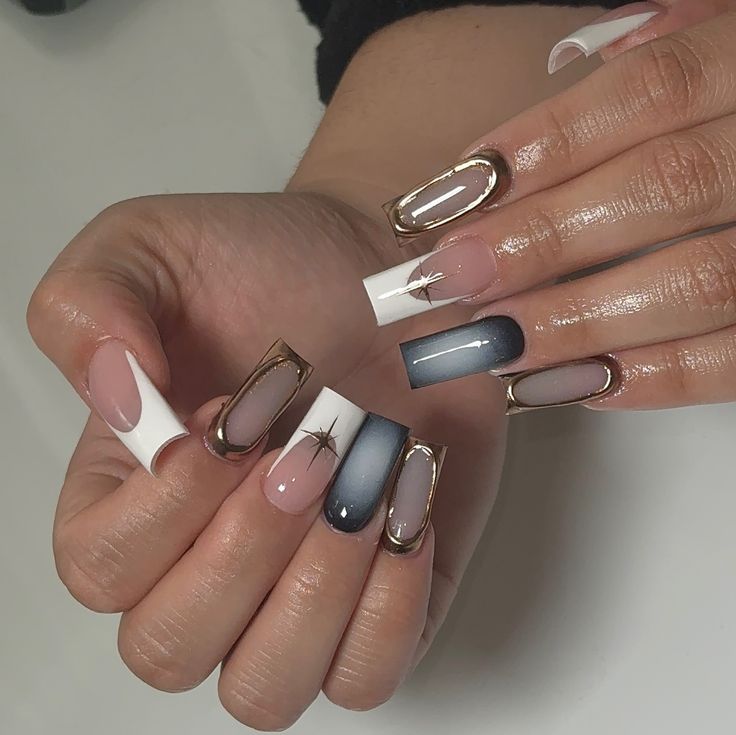
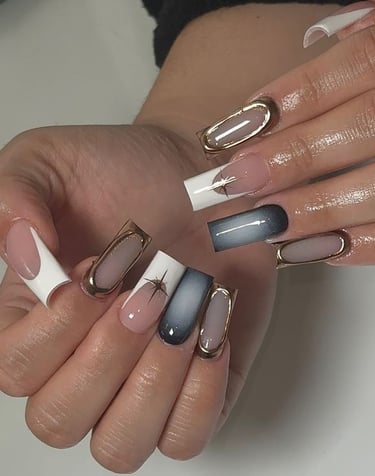
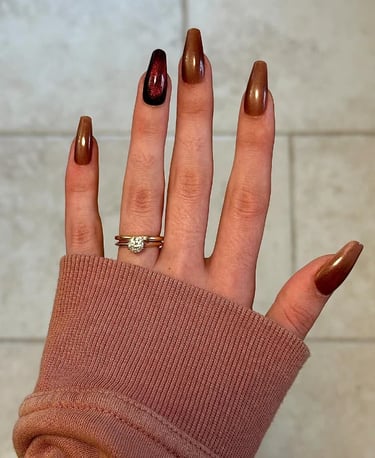
Material Analysis: The moment you open a GLAMERMAID set, the quality difference is tangible. These aren't the flimsy, cheap plastic press-ons from your childhood. They're constructed from durable ABS plastic with a professional-grade finish that mimics the look and feel of salon acrylics.
Design Precision: Every design I've tested features:
Intricate, detailed artwork with no bleed or smudging
Smooth, polished edges requiring minimal filing
Consistent color across all nail sizes
Professional-grade finishes (chrome, holographic, matte, glossy)
No rough patches or manufacturing defects
What this means for you: They look expensive, period. I've had countless people ask where I get my nails done, shocked when I tell them they're press-ons.
Perfect Fit Every Time
The Science of Sizing: Each GLAMERMAID set includes 24 nails in 12 different sizes – more than most brands. This matters because proper fit is THE most critical factor in longevity.
My sizing protocol: I lay out all sizes and match them to each finger before applying any adhesive. The variety means I can find exact matches for my nail beds, including my smaller pinky and wider thumbs.
Pro insight: Having tested multiple brands, GLAMERMAID's sizing range is superior. They accommodate wider nail beds (common on thumbs) and narrower shapes (typical on pinkies) better than competitors.
They Actually Stay On: The Longevity Test
I've conducted extensive wear testing with various application methods:
Test Results:
With premium nail glue: 12-16 days average wear
With included glue: 10-14 days average wear
With adhesive tabs: 5-7 days, but 100% reusable
Activities tested:
✅ Dishwashing (with and without gloves)
✅ Intense keyboard typing (I write 3,000+ words daily)
✅ Gym workouts including weights
✅ Showering, swimming, hot yoga
✅ Cooking, cleaning, daily life activities
Failure points: When nails did lift, it was consistently due to:
Insufficient nail prep (oil residue)
Exposure to water within first 2 hours
Using nails as tools (my own fault)
Never experienced: Random popping off, mass lifting, or adhesive failure when properly applied.
The Application Method: Scientifically Optimized for Results
I've refined this process through trial, error, and research into adhesive science. Here's the protocol that delivers professional results:
What You'll Need (The Complete Kit):
Essential Tools:
Your GLAMERMAID press-on nail set
Fine-grit nail file (180-240 grit)
Nail buffer block
Cuticle pusher (metal or wooden)
Cuticle remover gel (optional but recommended)
Alcohol prep pads or 99% isopropyl alcohol with lint-free wipes
Premium nail glue OR adhesive tabs (both included)
Small scissors (for any adjustments)
Optional but Helpful:
Cuticle oil (for post-application care)
Nail clippers (if you need to shorten dramatically)
Timer (for precise application pressure)
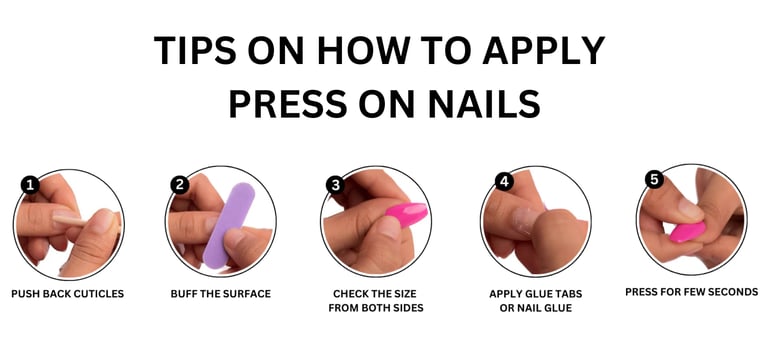
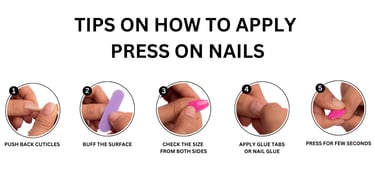
The Step-by-Step Protocol (Total Time: 15-20 minutes)
STEP 1: Nail Preparation (5-7 minutes) This is THE most critical step – skip it and you'll see lifting within days.
Detailed prep process:
Remove any existing polish completely – use acetone if needed
Push back cuticles – use cuticle remover gel and pusher, pushing gently but thoroughly
Trim natural nails short – they should extend just barely past your fingertip
File the free edge smooth – eliminate any snags that could catch the press-on
Buff the nail surface – GENTLY buff to remove shine and create texture for adhesion. Don't over-buff!
Cleanse thoroughly – use alcohol prep pad or wipe to remove all oils, dust, and residue
Let nails dry completely – wait 30 seconds after cleansing
Why this matters: Nail adhesive bonds to clean, slightly rough surfaces. Any oil, moisture, or smooth glossy surface will compromise the bond. Think of it as priming a wall before painting – proper prep determines longevity.
STEP 2: Strategic Size Selection (3-4 minutes) Before applying ANY adhesive, match sizes to each finger.
My selection method:
Lay out all 24 nails in size order
Match each finger, checking both width and curvature
Hold each press-on against your natural nail – it should cover edge to edge without overlapping skin
If between sizes, choose the smaller one (you can file the sides to expand fit)
Lay out your selected 10 nails in order
Pro tip: Take a photo of your layout so you don't mix them up during application!
STEP 3: Precision Application (6-8 minutes)
If using glue (my preferred method):
Apply glue to natural nail – thin, even layer covering the entire nail surface
Apply small dot of glue to press-on – on the side that will contact your nail
Position at cuticle first – align the press-on so the edge sits just above (not touching) your cuticle
Press down at 45-degree angle – start at cuticle, rock forward to tip, pressing out any air bubbles
Apply firm pressure for 30 seconds – use your opposite thumb to press down hard, focusing on cuticle area
Hold additional 10 seconds on tip – ensure full adhesion
Why 30 seconds matters: Cyanoacrylate adhesive (nail glue) begins bonding within 10 seconds but reaches initial cure strength at 30 seconds. Pressure during this window creates maximum bond strength.
If using adhesive tabs:
Select correct tab size – should cover your entire natural nail
Remove one protective layer – stick to natural nail, press firmly
Remove second protective layer – expose adhesive
Apply press-on immediately – you have about 10 seconds of optimal stickiness
Press firmly for 60 seconds – tabs require longer pressure than glue
Tab advantages: Completely reusable nails, easy removal, no commitment Tab disadvantages: Shorter wear time (5-7 days vs. 2 weeks)
STEP 4: Final Refinements (2-3 minutes)
File tips to desired length – use smooth, one-direction strokes
Shape the free edge – square, squoval, almond, or stiletto
Buff any rough edges – smooth the sides where press-on meets skin
Check each nail – ensure no lifting at cuticle area
Apply cuticle oil – around edges for a seamless, professional look
Total time investment: 15-20 minutes for salon-quality results that last 2 weeks.
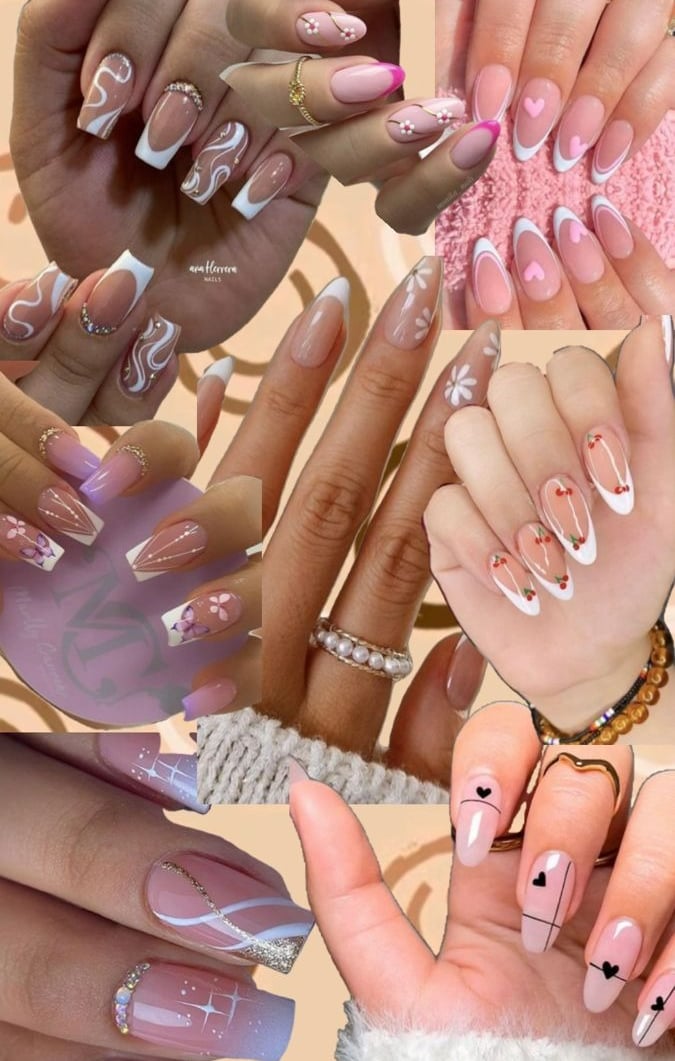
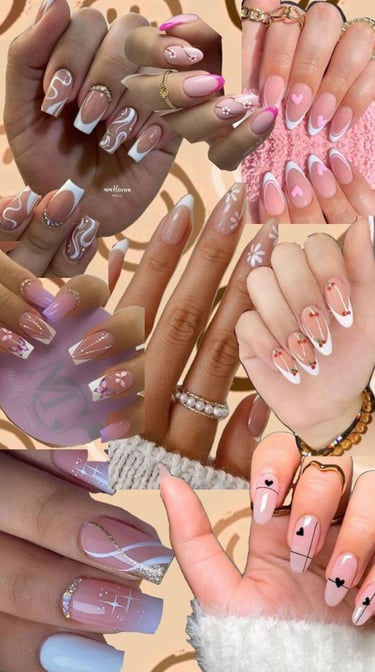
My Strategic Picks: Curated by Occasion & Style
After testing dozens of designs across multiple occasions, these are the sets that earned permanent spots in my collection. I'll break them down by use case so you can strategically build your own collection.
Category 1: The Professional Essentials
Nude almond press-ons with subtle shimmer When I wear them: Client meetings, video calls, professional networking, job interviews, conservative work environments Why they work: Sophisticated and polished without being distracting. The subtle shimmer adds dimension without screaming "look at my nails!" Perfect neutral that complements any outfit. Longevity: 14-16 days (my longest-wearing style) Reusability: Excellent – minimal wear even after 2 weeks
Soft pink or mauve in short coffin shape When I wear them: Daily work wear, casual professional settings, when I want polished but understated Why they work: Universally flattering, looks natural but elevated. The coffin shape is modern without being too trendy. Best for: Those in client-facing roles who want maintained nails without bold statements
Category 2: The Statement Makers
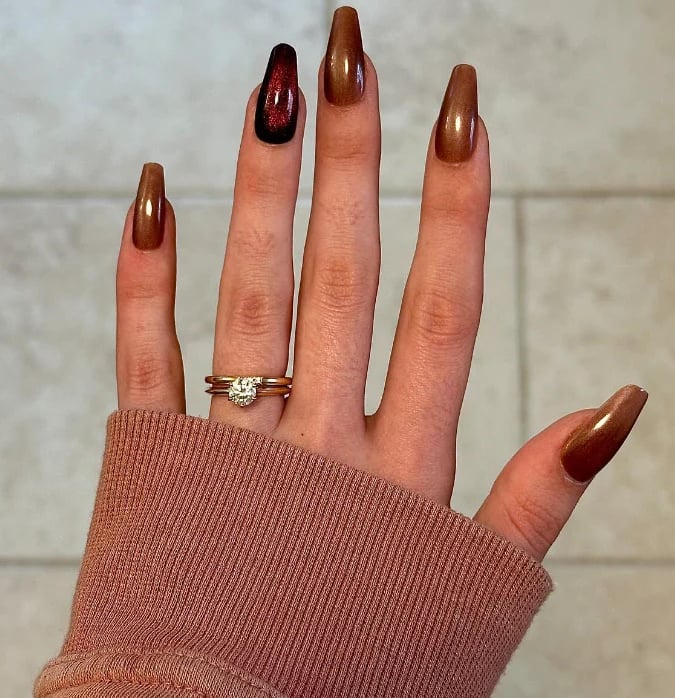
<u>Chrome or holographic finishes</u> When I wear them: Networking events, date nights, special occasions, photo shoots, when I need confidence Why they work: The mirror-like finish is technically impossible to achieve with regular polish at home. It's a conversation starter and photograph beautifully. Pro tip: These look stunning in both natural and artificial light, making them perfect for events with photography Best shapes: Almond or stiletto to maximize the reflective effect
Bold colored French tips (especially with metallic accents) When I wear them: Creative meetings, fashion events, girls' nights, anytime I want to feel bold Why they work: Modern twist on a classic that shows you understand current trends. Sophisticated enough for nice dinners, fun enough for parties.
Category 3: The Experimental Collection
Trendy designs: cow print, abstract art, colorful patterns When I wear them: Weekends, creative projects, casual outings, social media content creation, vacation Why they work: Low-commitment trend testing. Want to try Gen-Z cow print but not sure if it's you? Test it for a weekend! My favorites: Geometric designs, marble effects, mixed metal accents Best part: If I hate it, 15 minutes later I'm wearing something else
Category 4: The Seasonal Rotation
Spring/Summer picks: Pastel chrome, bright French tips, floral designs, coral tones Fall/Winter picks: Deep burgundy, chocolate brown, forest green, metallic gold Holiday specials: Red and gold, silver sparkle, winter white, champagne shimmer
Strategy: I rotate based on season and upcoming events, keeping 2-3 sets from each category in my collection at all times.
Common Mistakes & How to Avoid Them
After six months and countless applications, I've made every mistake so you don't have to. Here are the seven most common errors and their solutions:
Mistake #1: Skipping or Rushing Nail Prep
The problem: Oil, moisture, or debris on natural nails prevents adhesive bonding What happens: Press-ons lift within 1-3 days, often starting at the cuticle The solution: Never skip the alcohol wipe. NEVER. It takes 30 seconds and is the difference between 2-day wear and 2-week wear.
Mistake #2: Choosing Wrong Size
The problem: Press-ons that are too large overlap the skin/cuticle; too small leave gaps What happens: Water gets underneath, adhesive fails, nails pop off prematurely The solution: Take time to match sizes before gluing. When in doubt, go smaller and file the sides to fit.
Mistake #3: Insufficient Pressure During Application
The problem: Not pressing firmly enough or long enough during the crucial bonding period What happens: Weak bond, air bubbles, early lifting The solution: Set a timer for 30 seconds and apply FIRM pressure. Your thumb should actually feel tired.
Mistake #4: Water Exposure Too Soon
The problem: Getting nails wet within first 2 hours What happens: Adhesive hasn't fully cured, bond is compromised The solution: Plan your application timing. Apply nails 2+ hours before showering, dishwashing, or hand washing. Morning application works best.
Mistake #5: Using Nails as Tools
The problem: Opening cans, peeling stickers, prying things open with nails What happens: Stress on adhesive bond causes lifting or complete nail loss The solution: Treat them like expensive jewelry. Use actual tools for tasks. Keep a keychain multi-tool handy.
Mistake #6: Over-Filing Natural Nails
The problem: Aggressively buffing natural nails thinking more texture = better adhesion What happens: Damaged, thin, weak natural nails that take weeks to recover The solution: GENTLE buffing only – just enough to remove shine. You're creating texture, not removing layers.
Mistake #7: Forcing Removal
The problem: Pulling, prying, or forcing press-ons off when they're not ready What happens: Layers of your natural nail come off with the press-on, causing damage The solution: ALWAYS soak first. Patience during removal protects your nail health.
Longevity Optimization: Make Them Last 2+ Weeks
Based on extensive testing and research into adhesive science, here's the complete protocol for maximum wear time:
The First 48 Hours: Critical Care Period
Hour 0-2 (Immediate post-application):
✓ Avoid ALL water contact
✓ Keep hands dry and at room temperature
✓ Don't touch or pick at edges
✓ Let adhesive reach full cure strength
Hour 2-24:
✓ Gentle hand washing is okay (but minimize)
✓ Avoid hot water (weakens adhesive)
✓ No prolonged submersion (no swimming, bath, long shower)
✓ Wear gloves for any wet work
Day 2-7:
✓ Normal activities can resume
✓ Apply cuticle oil daily around edges
✓ Check for any lifting and address immediately
✓ Wear gloves for dishes/cleaning (optional but extends life 30%)
Daily Maintenance Protocol
Morning routine:
Apply drop of cuticle oil around each nail edge
Massage gently to keep cuticles moisturized
Check for any lifting
Throughout the day: 4. Avoid using nails as tools 5. Be mindful during typing, texting 6. Reapply hand cream after each wash
Evening routine: 7. Another application of cuticle oil 8. Gentle massage to keep skin soft around press-ons 9. Check for lifting, repair if needed
Quick Repair Protocol
If you notice lifting (DO NOT ignore it):
Clean under lifted area with alcohol wipe
Apply tiny drop of nail glue under lifted section
Press firmly for 30 seconds
Wipe away any excess glue immediately
This 2-minute fix can extend wear by an additional week. I keep a small nail glue bottle in my purse for emergency repairs.
Activities That Require Extra Care
Gym/Exercise:
Wear workout gloves for weights
Be cautious with equipment that could catch nails
Wipe hands thoroughly after sweating
Swimming:
Apply extra cuticle oil before and after
Rinse hands with fresh water immediately after pool/ocean
Chlorine and salt water weaken adhesive over time
Cooking:
Wear gloves when working with hot water
Be careful with sticky doughs (bread, pizza) that can catch edges
Acidic foods (lemon juice, vinegar) can affect adhesive
Cleaning:
ALWAYS wear gloves with cleaning products
Chemicals in cleaners degrade adhesive quickly
Harsh chemicals can dull the shine of press-ons
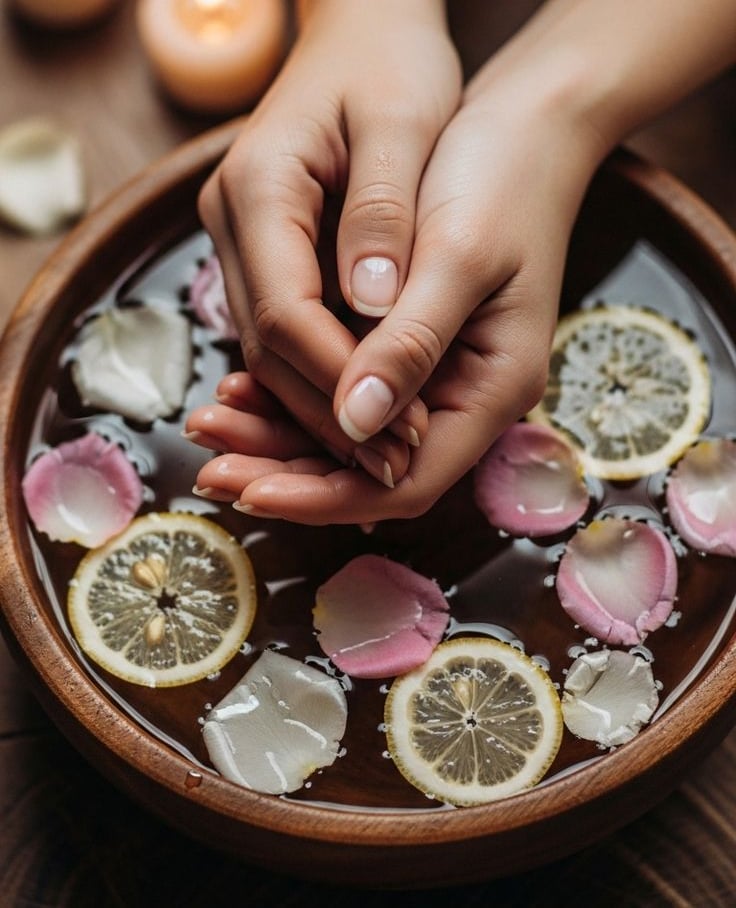
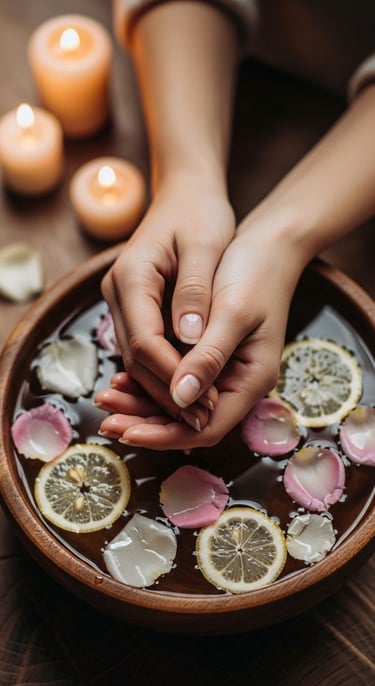
Safe Removal: Protecting Your Natural Nails
Proper removal is crucial for nail health. I cannot stress this enough: NEVER force or pry off press-ons. Here's the damage-free method I use every time:
The Gentle Removal Protocol (Total time: 15-20 minutes)
What you'll need:
Bowl of warm water
Gentle dish soap
Wooden cuticle stick or orangewood stick
Nail buffer
Cuticle oil
Step-by-step process:
STEP 1: The Soak (10-15 minutes)
Fill a bowl with warm (not hot) water
Add a few drops of gentle dish soap
Submerge nails completely
Wait patiently – this breaks down the adhesive
Why warm water works: It softens the adhesive bond without harsh chemicals. The soap helps break surface tension.
STEP 2: The Gentle Test (1 minute)
After 10 minutes, gently try to wiggle a press-on from side to side
If there's any resistance, soak 5 more minutes
NEVER force it
STEP 3: The Removal (2-3 minutes)
Once press-ons wiggle freely, slide them off gently
Start from the sides, not the tip
Use wooden stick to gently push under edge if needed
Work slowly and patiently
STEP 4: Adhesive Cleanup (2 minutes)
Remove any remaining adhesive with nail buffer
Buff GENTLY – you're removing residue, not layers of nail
Use wooden stick for stubborn bits
STEP 5: Nail Recovery (2 minutes)
Wash hands thoroughly
Buff natural nails gently to smooth surface
Apply generous amount of cuticle oil
Massage oil into nails and cuticles
Let nails "breathe" for 24-48 hours before next application
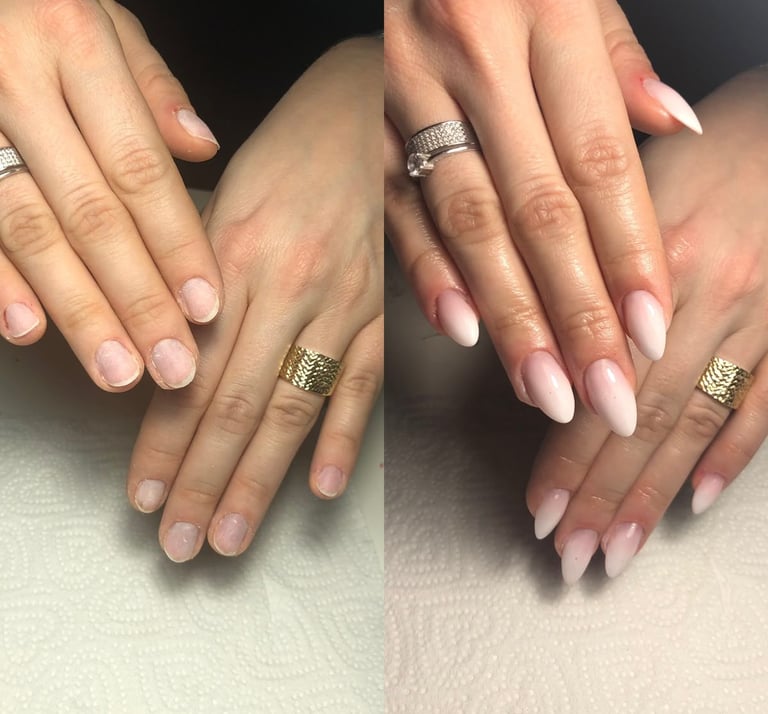
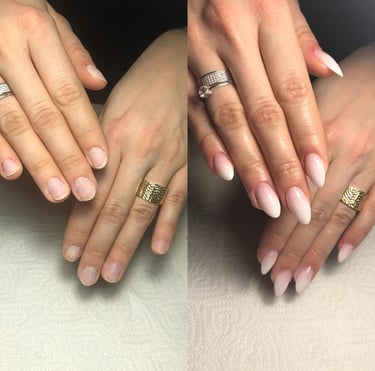
Result: Healthy, undamaged natural nails. After 6 months of this routine, my natural nails are actually stronger than when I was getting gel manicures.
What to Do with Removed Press-Ons
If used with adhesive tabs: Clean with alcohol wipe, store in original packaging, reuse up to 3 times
If used with glue: Clean off any remaining glue with nail file, can potentially reuse once if in good condition
Storage tip: Keep removed press-ons in a labeled ziplock bag with their size marked for future use.
Nail Care Between Applications: The Recovery Protocol
One major advantage of press-ons over gel or acrylics: your nails can actually recover and strengthen between applications. Here's my nail health protocol:
The 24-48 Hour Recovery Period
Immediately after removal:
Apply intensive nail and cuticle treatment oil
Massage for 2-3 minutes to increase blood flow
Let nails go bare – no polish, no press-ons
Day 1-2 post-removal:
Apply cuticle oil 3-4 times daily
Take biotin supplement (supports nail strength)
Keep hands moisturized
Avoid harsh chemicals and excessive water
Building Natural Nail Strength
Daily supplements I take:
Biotin (2,500-5,000 mcg)
Collagen peptides (in coffee or smoothies)
Omega-3 fatty acids
Multi-vitamin with adequate zinc
Topical treatments:
Nail strengthener (apply every 3 days)
Cuticle oil (daily, sometimes twice daily)
Rich hand cream (after every hand wash)
Results after 6 months: My natural nails are longer, stronger, and healthier than they've been in years. The breaks between press-on wear actually benefit nail health.
GLAMERMAID Collections Guide: Find Your Perfect Match
GLAMERMAID offers several distinct collections, each with its own aesthetic and purpose. Here's my guide to finding your perfect match:
The Classics Collection
Aesthetic: Timeless, elegant, universally flattering Best for: Professional environments, beginners, anyone building a foundational collection My picks: French tips, nude tones, soft pinks Price range: $15-20 When to wear: 90% of occasions
The Chrome & Metallic Collection
Aesthetic: Modern, eye-catching, trendy Best for: Special events, photo shoots, making statements My picks: Silver chrome, rose gold, holographic Price range: $18-25 When to wear: Events, nights out, creative settings
The Seasonal Collection
Aesthetic: Trend-forward, fun, often limited edition Best for: Experimenting with trends, seasonal style switches My picks: Varies by season – currently loving autumn burgundy Price range: $18-22 When to wear: Casual weekends, social events
The Artistic Collection
Aesthetic: Bold, creative, conversation-starting Best for: Expressing personality, creative industries, social media content My picks: Abstract designs, geometric patterns, mixed media Price range: $20-25 When to wear: When you want your nails to be the accessory
My recommendation: Start with 2 sets from Classics, 1 from Chrome, and experiment from there based on your lifestyle.
Styling Guide: Nails for Every Occasion
One of the biggest advantages of press-ons is the ability to strategically match your nails to any situation. Here's my complete styling guide:
Professional Settings
Corporate office/Client-facing roles:
Best choices: Short to medium length, nude, soft pink, classic French
Shapes: Squoval, short almond
Why: Professional without being distracting, shows attention to detail
Avoid: Extreme length, loud colors, excessive sparkle
Creative industries:
Best choices: Any length, trendy colors, artistic designs
Shapes: Almond, stiletto, coffin
Why: Shows personality and creativity
Embrace: Bold choices, current trends, unique designs
Medical/Food service:
Best choices: Short length, neutral colors
Shapes: Square or squoval for durability
Why: Hygiene requirements, practical for handwashing
Note: Check workplace policy first
Social Occasions
Date nights:
Best choices: Medium length, romantic colors (deep red, wine, rose gold)
Shapes: Almond or stiletto
Why: Elegant and feminine without trying too hard
Mood: Sophisticated confidence
Girls' night/Casual hangouts:
Best choices: Fun designs, trendy colors, experimental looks
Shapes: Whatever you want to try!
Why: Low-stakes environment to test new styles
Embrace: Bold choices, fun conversations about them
Weddings (as guest):
Best choices: Elegant, complement your outfit, avoid outshining bride
Shapes: Classic almond or oval
Colors: Coordinate with dress – metallics work universally
Why: Polished look for photos without being attention-grabbing
Special Events
Job interviews:
Best choices: Conservative, well-maintained neutrals
Length: Short to medium
Why: Shows grooming without distraction
Goal: Memorable for skills, not nails
Vacation/Travel:
Best choices: Durable designs, colors that match multiple outfits
Pro tip: Apply 1-2 days before leaving when you have time and supplies
Why: No worry about chipping mid-trip
Bonus: Great for travel photos!
Photo shoots/Special photography:
Best choices: Chrome, metallics, anything that photographs well
Avoid: Subtle shimmer (doesn't show in photos)
Consider: Lighting conditions where photos will be taken
The ROI Analysis: 6-Month Results
I'm a data person, so I tracked everything over six months. Here are my results:
Financial ROI
Previous annual nail spending (gel manicures 2x/month):
24 appointments × $60 average = $1,440
Tips = $240
Total: $1,680
Six-month press-on spending:
12 GLAMERMAID sets × $20 average = $240
Nail glue supply = $15
Tools (one-time): $25
Total: $280
Six-month savings: $560 Projected annual savings: $1,120+
What I did with savings: Invested in a high-quality skincare routine and saved the rest.
Time ROI
Previous time commitment:
2 hours salon time + 1 hour travel × 24 visits = 72 hours annually
Press-on time commitment:
20 minutes application × 24 times = 8 hours annually
Time reclaimed: 64 hours per year (more than a full work week!)
What I did with time: Started a side project, read 8 books, worked out consistently, actually had free weekends.
Nail Health Assessment
Before (after years of gel):
Thin, brittle natural nails
Yellow tinge from UV exposure
Constant peeling
Dependent on professional care
After 6 months:
Stronger, healthier natural nails
Natural pink color returned
Minimal breaking or peeling
Can go bare when needed
Health improvement: Significant and measurable
Lifestyle Flexibility
Before: Scheduled life around nail appointments, panicked about chips, limited to one look per 2-3 weeks
After: Change styles freely, never worry about chips, perfect nails in 15 minutes anytime
Flexibility value: Immeasurable
Frequently Asked Questions: Everything You Need to Know
After sharing my press-on journey, I get asked these questions constantly:
Q1: "Do press-ons damage natural nails?"
A: NO – when applied and removed correctly. The key is:
Proper application (don't over-buff natural nails)
Patient removal (always soak first, never force)
Recovery periods between applications
In fact, my natural nails are healthier now than after years of gel manicures. Press-ons act as a protective layer, and you avoid the UV damage and harsh chemicals of gel/acrylic.
Q2: "How long do GLAMERMAID press-ons actually last?"
A: With proper application:
Glue application: 10-16 days average (my personal record is 18 days)
Adhesive tabs: 5-7 days, but fully reusable
Longevity depends on:
Nail prep quality
Daily activities
Hand washing frequency
Whether you wear gloves for wet work
Q3: "Can I reuse them?"
A: YES, especially with adhesive tabs!
With tabs: 2-3 full wears per set
With glue: 1-2 wears if carefully removed and cleaned
I regularly reuse sets applied with tabs. After gentle removal, I clean with alcohol, store in the original packaging, and they're ready for next time.
Q4: "What if the size isn't perfect?"
A: File the sides! The beauty of press-ons is customization.
Too wide? File the sides gradually until perfect
Slightly too narrow? File your natural nail edges slightly
Wrong shape? File to your preferred shape
I've never had a set where at least 8 out of 10 weren't perfect fits initially.
Q5: "Will people know they're fake?"
A: Honestly? NO. I get compliments constantly, and people are shocked when I tell them.
The quality of modern press-ons, especially <u>GLAMERMAID's professional finishes</u>, is indistinguishable from salon work. The chrome finishes especially look exactly like expensive gel manicures.
Q6: "What about typing and daily activities?"
A: Non-issue once you adjust (takes 1-2 hours max).
I type 3,000+ words daily, work out, cook, clean, and live normally. The key is:
Choose appropriate length (medium or shorter for very active lifestyles)
Give yourself a brief adjustment period
Be mindful for the first few hours
After day one, you won't even notice them.
Q7: "Are they worth it for short-term events?"
A: ABSOLUTELY. This is actually their biggest advantage!
Need perfect nails for a wedding this weekend but don't want the commitment? Press-ons are ideal:
Apply Saturday morning
Perfect nails for the event
Remove Sunday night if desired
Zero long-term commitment
I do this for special photo shoots and events all the time.
Q8: "What's the difference between cheap and quality press-ons?"
A: Everything. I've tested both extensively.
Cheap press-ons ($5-8):
Thin, flimsy plastic
Poor size range
Designs chip or peel
Last 2-3 days maximum
Look obviously fake
Quality press-ons like GLAMERMAID ($15-25):
Thick, durable material
Excellent size range
Professional-grade designs
Last 1-2+ weeks
Look salon-quality
The price difference is minimal compared to salon costs, and the quality difference is massive.
Q9: "Can I paint over them or add designs?"
A: YES! Press-ons are a blank canvas.
You can:
Apply regular nail polish over them
Add nail art
Use nail stickers or gems
Change the look completely
Just use regular nail polish remover when you want to remove the design – it won't damage the press-on.
Q10: "What if one pops off?"
A: Quick 2-minute fix!
Clean both the press-on and your natural nail with alcohol
Apply fresh glue
Press firmly for 30 seconds
Good as new
I keep a small nail glue in my purse for exactly this reason (though it rarely happens with proper application).
My Current Rotation: What's in My Collection
After six months of testing, here's what's permanently in my nail drawer:
Daily Drivers (Always stocked):2 sets nude/neutral (different undertones for different outfits)
1 set classic French tips
1 set soft pink or mauve
Statement Pieces (For special occasions):
1 set chrome (silver or rose gold)
1 set holographic
1 set deep red or burgundy
Experimental/Seasonal (Rotates quarterly):
2-3 trendy designs
1 bold color I'm currently loving
1 seasonal design
Total collection value: ~$180 Total sets: 10-12 at any time Replacement frequency: Every 2-3 months for daily drivers
Storage solution: I use a clear acrylic drawer organizer to keep sets separated and easy to find. Each set stays in its original packaging with size notes written on the box.
The Verdict: Worthy of Your Chic Geek Edit?
After six months of exclusive press-on wear, extensive testing, and detailed data tracking, here's my final analysis:
Why GLAMERMAID Press-Ons Earned Their Spot?
✓ Data-backed value: Proven cost savings of $1,000+ annually and 60+ hours reclaimed
✓ Quality performance: Matches or exceeds salon results in appearance, durability, and finish quality
✓ Strategic versatility: Adapts to any lifestyle need – professional, creative, casual, formal
✓ Smart investment: Reusable, cost-effective, practical, and delivers measurable ROI
✓ Health-conscious: Protects and strengthens natural nails instead of damaging them
✓ Flexibility factor: Change styles instantly, experiment without commitment, never be locked into one look
✓ Time optimization: 15-minute application vs. 2-hour salon visits
✓ Sustainable choice: Less chemical waste, reusable options, fewer resources than constant salon visits
Who This Is Perfect For:
Busy professionals who need polished nails without time commitment
Anyone wanting to save money without sacrificing quality
People with damaged nails from gel/acrylics who want recovery
Trend experimenters who love trying new styles
Those who need flexibility in their beauty routine
Anyone who values efficiency and results
Who Might Prefer Alternatives:
Those who want extreme length (though long press-ons exist)
People who genuinely enjoy the salon experience as relaxation
Anyone with very unique nail shapes that need custom work
The Bottom Line:
If you're optimizing your beauty routine for efficiency without sacrificing style, GLAMERMAID press-ons are an absolute game-changer. They've transformed how I think about nail care – from time-consuming obligation to quick, flexible, fun self-care.
The financial savings alone would make them worthwhile, but add in the time reclaimed, the nail health benefits, and the unlimited style flexibility? It's one of the smartest beauty switches I've ever made.
Ready to make the switch? Explore GLAMERMAID's complete collection here and find your perfect match.
Shop This Curated Edit
My Top Recommendations:
Start here: Classic Nude Collection (perfect for beginners)
First statement piece: Chrome or Holographic Collection
For experimenting: Current Seasonal Collection
Everything featured: Shop GLAMERMAID Official Store
Join The Chic Geek Community
I share my latest nail finds, honest reviews, and beauty optimization tips exclusively with The Chic Geek Edit community:
📌 Save this guide to your Beauty Board on Pinterest 💬 Drop a comment below with your biggest nail question 📧 Subscribe for weekly curated edits of products worth your money .
Your turn: What's your biggest nail maintenance challenge? Are you team salon or ready to try press-ons? Let me know in the comments – I read and respond to every one!
Related Curated Edits You'll Love
Coming soon on The Chic Geek Edit:
"The Minimalist's Complete Skincare Routine: Only 5 Products You Actually Need"
"Travel Beauty Essentials: TSA-Friendly Products That Actually Work"
"Effortless Style: Building a Capsule Wardrobe That Works"
Disclosure: This post contains affiliate links. If you purchase through these links, I may earn a small commission at no extra cost to you. I only recommend products that have been thoroughly tested and genuinely deserve a spot in my curated collection. All opinions are 100% my own, backed by six months of real experience, testing, and detailed data tracking. I purchased my first GLAMERMAID sets with my own money before ever considering affiliate partnership.
A Final Note: Beauty should enhance your life, not complicate it. Press-on nails gave me back time, money, and confidence. If this guide helps you make a smarter choice for your routine, my work here is done. Here's to looking polished while living efficiently! 💅✨
Pin this comprehensive guide for whenever you need it! 📌
Quick Reference Cheat Sheet:
⏱️ Application time: 15 minutes
💰 Cost per set: $15-25
📅 Wear time: 10-16 days
♻️ Reusable: 2-3 times with tabs
🎨 Style flexibility: Unlimited
💪 Nail health: Improves over time
📊 Annual savings: $1,000+
Save this post • Share with friends • Start your press-on journey
Thank you for reading The Chic Geek Edit – where we pick smarter, live better, and look effortlessly chic.